
A true, classic red velvet cupcake is far more than an ordinary vanilla cupcake dyed with food coloring. It is a distinct baking masterclass in chemical balance, delivering a unique flavor profile that sits squarely at the crossroads of buttery vanilla and mild, earthy cocoa. The texture should be completely singular: incredibly plush, fine-grained, and velvety—hence its iconic name. If your homemade red velvet cupcakes consistently turn out dry, dense, or resemble standard chocolate muffins with a dull, brownish-red color, it comes down to acid management and cocoa selection.
The primary culinary secret to that vibrant crimson hue and meltingly soft texture is the Acid-Activated Cocoa Strategy. Rather than relying purely on artificial dyes, authentic red velvet hinges on a chemical reaction between natural, unalkalized cocoa powder and acidic elements like buttermilk and vinegar. When these acids meet the cocoa, they break down tight gluten bonds to ensure an ultra-tender crumb, while simultaneously preserving the natural anthocyanin pigments in the cocoa, making them bloom into a bright red color. To lock this reaction in place, we use a tiny dash of baking soda and vinegar at the absolute end of mixing to force a final rise that makes the cupcakes beautifully airy and light.
Why You’ll Love This Sweet Treat
- The Famous Velvety Crumb: The heavy use of buttermilk and oil weakens the flour’s structural protein web, yielding a cake texture that genuinely feels like velvet on the tongue.
- The Perfect Tangy Flavor Balance: The subtle, earthy depth of cocoa is brightened by the acidity of the buttermilk and capped off with a rich, tangy cream cheese frosting.
- Stays Moist for Days: Relying on neutral vegetable oil instead of solid creamed butter guarantees that these cupcakes stay incredibly soft and juicy, even when chilled.
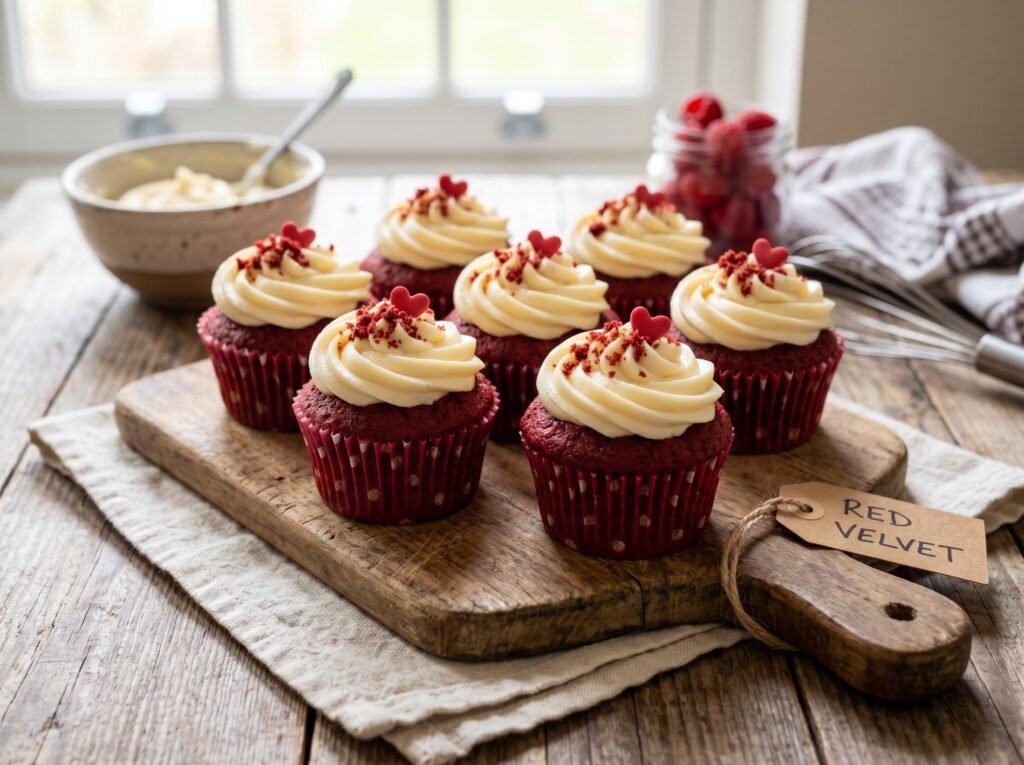
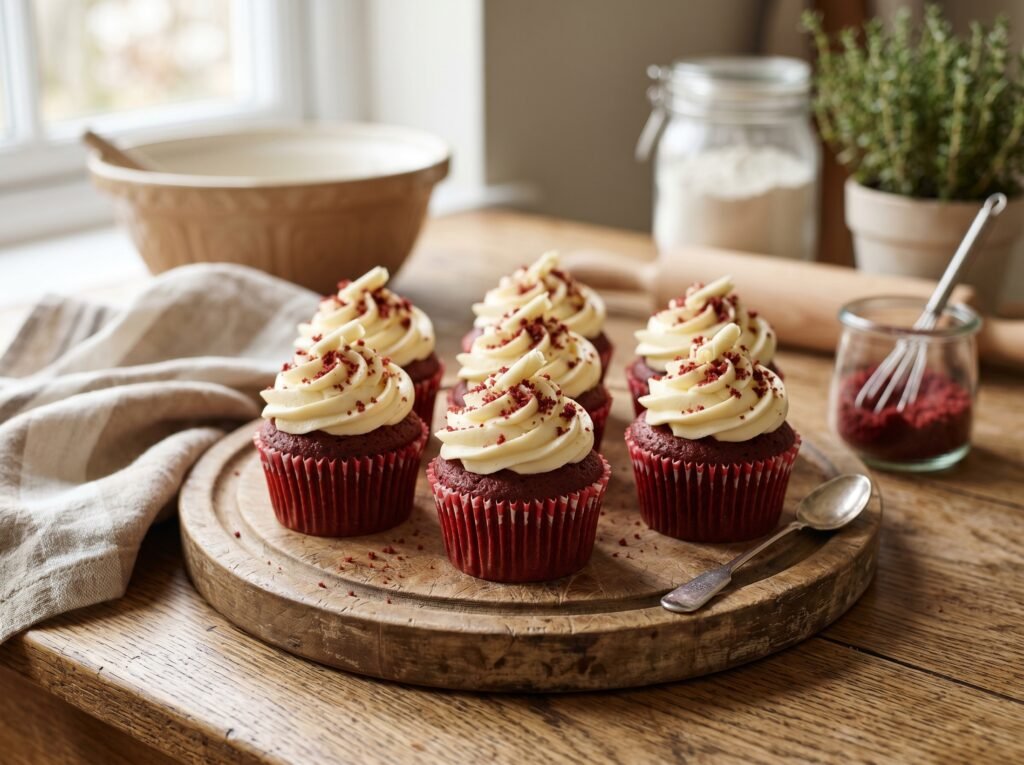
- That Vibrant Visual Contrast: The striking juxtaposition of the deep crimson cake against a pristine, snowy mountain of cream cheese frosting makes these an absolute showstopper.
Key Ingredients Overview
- Natural Unalkalized Cocoa Powder: Do not use Dutch-processed cocoa powder. Dutch cocoa has been treated with alkali to neutralize its acids, which turns it dark and destroys the chemical reaction needed to help the red color bloom. Natural cocoa is acidic and reacts perfectly with buttermilk.
- Real Full-Fat Buttermilk: Buttermilk is non-negotiable here. It provides the necessary lactic acid to tenderize the crumb and reacts with the baking soda to give the cupcakes a flawless, uniform rise.
- White Distilled Vinegar & Baking Soda: Added right at the end of the mixing process, this classic foaming combination generates a final burst of carbon dioxide bubbles, ensuring the dense batter bakes up light and airy rather than heavy or gummy.
- Gel Food Coloring: To achieve that vivid, jaw-dropping crimson color without thinning out your batter, use a high-quality gel or paste food coloring rather than a water-based liquid dye.
Step-by-Step Instructions
1.The Moderate Oven Target:2 min.
Preheat your oven to 175°C (350°F). Line a standard 12-cup muffin tin with paper liners. Ensure your eggs and buttermilk are sitting out on the counter to reach room temperature.
2.The Dry Cocoa Sift:4 min.
In a medium bowl, whisk together the all-purpose flour, natural cocoa powder, baking powder, and fine sea salt. Sifting or whisking these together is vital to break up any stubborn clumps of cocoa powder, ensuring a perfectly smooth batter later.
3.The Crimson Oil Emulsion:4 min.
In a large bowl, vigorously whisk your vegetable oil and granulated white sugar together until unified. Whisk in the room-temperature eggs one at a time, followed by the vanilla extract and your red gel food coloring. Whisk until you have an incredibly smooth, glossy, deeply red liquid base.
4.The Alternating Dairy Stream:3 min.
Add one-third of your dry flour mixture to the red oil base and gently fold with a rubber spatula just until it disappears. Pour in half of your buttermilk and stir gently. Repeat this alternating process—finishing with the final third of the flour—mixing just until no white streaks remain.
5.The Vinegar Soda Fizz Lock:2 min.
In a tiny cup, combine your baking soda and distilled white vinegar. It will instantly fizz and foam aggressively. Immediately pour this bubbling mixture into your cake batter and fold it in quickly but gently with your spatula until fully incorporated.
6.The Uniform Cup Fill:2 min.
Divide the smooth, vibrant red batter evenly among your 12 lined muffin cups, filling each liner roughly two-thirds of the way full. Do not overfill, or the cupcakes will bake with flat, muffin-top edges rather than a neat dome.
7.The Velvety Oven Bake:18 min.
Bake at 175°C (350°F) for 16 to 18 minutes. The cupcakes are done when the tops spring back lightly when touched, or a toothpick inserted into the absolute center comes out clean. Cool in the pan for 5 minutes, then transfer to a wire rack to cool completely.
8.The Tangy Cream Frosting Whip:5 min.
While the cupcakes cool, beat your block cream cheese and softened butter together with an electric mixer for 2 minutes until completely smooth. Gradually add the powdered sugar and vanilla, beating on low speed until combined, then high speed for 1 minute until ultra-fluffy. Pipe onto the completely cooled cupcakes.
Expert Tips for Success
- Never Overmix After Adding the Fizz: The moment the foaming vinegar and baking soda mixture hits the batter, the clock is ticking. Fold it in quickly and gently, and get those cupcakes into the hot oven right away. If you let the batter sit on the counter too long, the carbon dioxide bubbles will escape, and your cupcakes will lose their light, airy rise.
- Keep Cream Cheese Cold and Butter Soft: For the ultimate cream cheese frosting that holds its shape cleanly through a piping bag without turning into a runny puddle, use brick cream cheese straight from the fridge, but ensure your butter is fully softened to room temperature before beating them together.
- Cool Completely Before Frosting: It can be tempting to frost them early, but red velvet cupcakes are incredibly delicate and hold moisture well. If the cupcakes are even slightly warm, the high fat content in the cream cheese frosting will melt instantly, causing your beautiful piped swirls to slide right off.
The Recipe Card
- Prep Time: 20 mins
- Cook Time: 18 mins
- Cooling Time: 30 mins
- Total Time: 1 hr 8 mins
- Yield: 12 Elegant Cupcakes
Ingredients:
- The Velvet Cupcake Batter: 190g (1 ½ cups) All-Purpose Flour, 2 tbsp Natural Unalkalized Cocoa Powder, ½ tsp Baking Powder, ½ tsp Fine Sea Salt, 150g (¾ cup) Granulated White Sugar, 180ml (¾ cup) Vegetable or Canola Oil, 1 Large Egg (room temperature), 1 tsp Pure Vanilla Extract, 120ml (½ cup) Full-Fat Buttermilk (room temperature), 1 to 2 tsp High-Quality Red Gel Food Coloring, 1 tsp Distilled White Vinegar, ½ tsp Baking Soda.
- The Tangy Cream Cheese Frosting: 225g (1 block / 8 oz) Brick Cream Cheese (cold), 115g (½ cup) Unsalted Butter (softened to room temp), 360g (3 cups) Powdered Sugar (sifted), 1 tsp Pure Vanilla Extract, a tiny pinch of salt.
Instructions:
Preheat oven to 175°C (350°F) and line a 12-cup muffin tin with paper liners. In a medium bowl, whisk the flour, cocoa powder, baking powder, and salt. In a large bowl, whisk the oil and sugar together, then beat in the egg, vanilla, and red gel food coloring until a smooth crimson liquid forms. Alternately fold in the dry ingredients and the buttermilk in three batches, mixing just until combined. In a small cup, mix the baking soda and vinegar until bubbling, then quickly fold into the batter. Divide batter evenly among the cups. Bake for 16-18 minutes until a toothpick comes out clean. Cool completely. For the frosting, beat the cream cheese and butter until smooth, then gradually mix in the powdered sugar, vanilla, and salt until light and fluffy. Pipe generously onto cooled cupcakes.
